วันเสาร์ที่ 1 ตุลาคม พ.ศ. 2559

Read HTTP data with LoopJ

บทนำ

Software ในปัจจุบันจะแยกการทำงานของ "Service" หรือที่เป็น back-end กับ front-end (พวก GUI ต่าง ๆ ออกจากกัน) และ นิยมแลกเปลี่ยนข้อมูลกันด้วย JSON Format บทความนี้จะแนะนำวิธีการอ่าน JSON ใน Android จาก HTTP Server  ดังนี้ (ขอแนะนำให้อ่าน PHP-Array ก่อนครับ)

Service:  Laravel 5 + MySQL
Android: loopJ

โดยปรกติ วิธีการอ่านข้อมูลจาก HTTP นั้น เราสามารถใช้ HttpURLConnection เพื่ออ่านมาเป็น InputStream ได้ แต่การใช้งานให้ดี เราควรจะต้องเขียนในลักษณะแยกการทำงาน เป็น Thread ออกไป ซึ่งมีการนำ AsynTask มาใช้ เพื่อให้โปรแกรมทำงานได้เร็วยิ่งขึ้น การเขียน AsynTask มีความซับซ้อนสำหรับมือใหม่พอสมควร (แต่ก็ต้องหัดอยู่ดีแหละ) วันนี้ ผมมี Library LoopJ มาฝากครับ


เริ่มต้น เตรียม HTTP ไว้ พ่น JSON ออกมา

Route::get('/jsonArray', function () {
$message = App\Message::all();
return $message;
});
Route::get('/jsonObject',function() {
$cars = [
"id1" => ["brand" => "Volvo", "color" => "red", "number" => 123],
"id2" => ["brand" => "BWM", "color" => "blue", "number" => 453],
"id3" => ["brand" => "Toyota", "color" => "green", "number" => 985]
];
echo json_encode($cars,JSON_PRETTY_PRINT);
});
ตัวอย่าง code ใน routes.php ของ Laravel อันบนเป็น JSON Array ที่อ่านข้อมูลจาก Model App\Message ดังตารางนี้


ลองเรียก URL ทั้ง 2 จะได้ดังนี้

Test: http://Laravel-Server/public/jsonObject
Output:
{ "id1": { "brand": "Volvo", "color": "red", "number": 123 }, "id2": { "brand": "BWM", "color": "blue", "number": 453 }, "id3": { "brand": "Toyota", "color": "green", "number": 985 } }

JSON ที่สร้างมาจากการดึงข้อมูลจากตาราง message
Test: http://Laravel-Server/public/jsonArray
Output:
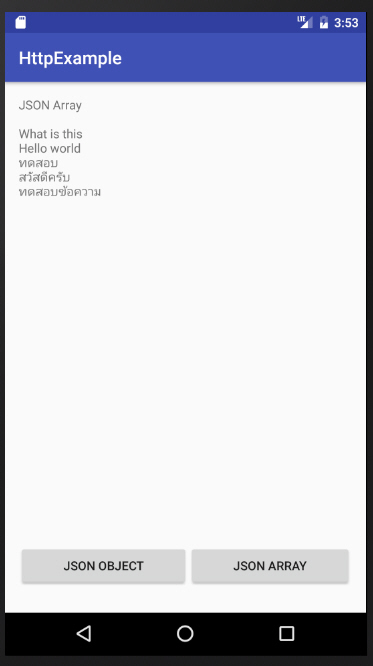
[{"id":60,"user_id":1,"message":"What is this"},{"id":61,"user_id":1,"message":"Hello world"},{"id":67,"user_id":2,"message":"\u0e17\u0e14\u0e2a\u0e2d\u0e1a"},{"id":79,"user_id":1,"message":"\u0e2a\u0e27\u0e31\u0e2a\u0e14\u0e35\u0e04\u0e23\u0e31\u0e1a "},{"id":80,"user_id":1,"message":"\u0e17\u0e14\u0e2a\u0e2d\u0e1a\u0e02\u0e49\u0e2d\u0e04\u0e27\u0e32\u0e21"}]

เท่านี้ JSON HTTP ก็พร้อมใช้งาน

ฝั่ง Android

เริ่มจากเพิ่ม build.gradle ในส่วนของ module
dependencies {
   compile 'com.loopj.android:android-async-http:1.4.9'
 ...
}

จากนั้น เพิ่ม INTERNET permission ใน AndroidManifest.xml
   uses-permission android:name="android.permission.INTERNET"

ใช้ 2 class นี้ ในการดึงข้อมูลจาก HTTP
public class ClientFacade {
private static final String BASE_URL = "http://Server-IP/laravel/www/public/";
private static AsyncHttpClient client = new AsyncHttpClient();
public static void get(String url, RequestParams params, AsyncHttpResponseHandler responseHandler) {
client.get(getAbsoluteUrl(url), params, responseHandler);
}
public static void post(String url, RequestParams params, AsyncHttpResponseHandler responseHandler) {
client.post(getAbsoluteUrl(url), params, responseHandler);
}
private static String getAbsoluteUrl(String relativeUrl) {
return BASE_URL + relativeUrl;
}
}
ข้อควรระวัง: ในส่วนของการกำหนด URL ห้ามระบุเป็น localhost หรือ 127.0.0.1 เพราะจะเป็นการอ้างอิงถึง web server ใน Emulator หรือเครื่องโทรศัพท์ ทำให้ ไม่สามารถติดต่อได้

package com.warodom.httpexample;
import android.support.v7.app.AppCompatActivity;
import android.os.Bundle;
import android.util.Log;
import android.view.View;
import android.widget.Button;
import android.widget.TextView;
import com.loopj.android.http.*;
import org.json.*;
import java.util.Iterator;
import cz.msebera.android.httpclient.Header;
public class MainActivity extends AppCompatActivity {
private TextView tvJson;
private Button btnJsonObj;
private Button btnJsonArray;
@Override
protected void onCreate(Bundle savedInstanceState) {
super.onCreate(savedInstanceState);
setContentView(R.layout.activity_main);
tvJson = (TextView)findViewById(R.id.tv);
btnJsonObj = (Button) findViewById(R.id.btnJsonObj);
btnJsonArray = (Button) findViewById(R.id.btnJsonArray);
btnJsonObj.setOnClickListener(new View.OnClickListener() {
@Override
public void onClick(View v) {
try {
tvJson.setText("");
getMessage("jsonObject");
} catch (JSONException e) {
e.printStackTrace();
}
}
});
btnJsonArray.setOnClickListener(new View.OnClickListener() {
@Override
public void onClick(View v) {
try {
tvJson.setText("");
getMessage("jsonArray");
} catch (JSONException e) {
e.printStackTrace();
}
}
});
}
public void getMessage(String path) throws JSONException {
ClientFacade.get(path, null, new JsonHttpResponseHandler() {
@Override
public void onSuccess(int statusCode, Header[] headers, JSONObject response) {
Log.d("----", "JSON Object");
tvJson.setText("JSON Object \n\n");
try {
Iterator<String> iter = response.keys();
while( iter.hasNext()) {
String key = iter.next();
Object value = response.get(key);
Log.d("----", value.toString() );
tvJson.append(value.toString() + "\n");
JSONObject jo = new JSONObject(value.toString());
Iterator<String> iter1 = jo.keys();
while( iter1.hasNext()) {
String key1 = iter1.next();
Log.d("----", jo.get(key1).toString() );
}
}
} catch (JSONException e) {
e.printStackTrace();
}
}
@Override
public void onSuccess(int statusCode, Header[] headers, JSONArray message) {
Log.d("----", "JSON Array");
tvJson.setText("JSON Array \n\n");
try {
for (int i=0;i< message.length();i++) {
JSONObject jsObj = (JSONObject) message.get(i);
Log.d("----", jsObj.getString("message"));
tvJson.append(jsObj.getString("message") + "\n");
}
}
catch (JSONException ex) {
ex.printStackTrace();
}
}
@Override
public void onFailure(int statusCode, Header[] headers, Throwable throwable, JSONObject response) {
Log.d("----", "" + statusCode);
Log.d("----", "" + throwable);
}
@Override
public void onFailure(int statusCode, Header[] headers, String responseString, Throwable throwable) {
Log.d("----", ""+ statusCode);
Log.d("----", "" + throwable);
}
});
}
}
จะเห็นได้ว่า Code ของ LoopJ นั้น มีการแยก Method ที่ onSuccess (กรณีที่ส่งค่ามาเป็น HTTP 2xx และ onFailure (HTTP status 3xx,4xx) ทำให้ง่ายแก่การจัดการ และใน onSuccess ก็มีการทำ Overload method แยกค่าที่ได้ ว่าเป็น JSON Array หรือ JSON Object โดยอัตโนมัติ

ตัวอย่างการดึงข้อมูลมาแสดง


Source code: https://github.com/wwarodom/HttpExample

ไม่มีความคิดเห็น: